
How to Warp an Image in Photoshop: A Simple and Correct Method
- September 1, 2026
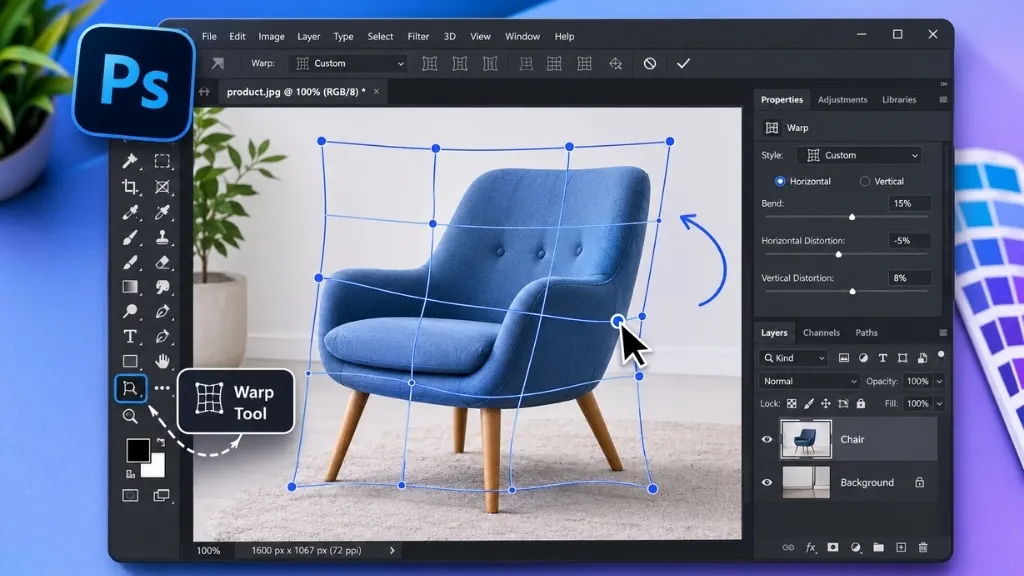
So you’re looking for how to warp an image in Photoshop? If you have then you’ve come to the right place. The Warp Tool is a basic yet highly vital tool that allows you to warp, squeeze, or manipulate any image like a pretend master of the universe with the click of a mouse and make sure it looks pristine. Warping images is an essential skill for a professional finish no matter if its product photography, model photography or other things. In this blog, we will be going to walk you through the step by step scree If how easy it can be in warping an Image using photoshop with some common mistakes while doing this and why it matters. And a case study to help you learn the process in practice.
What Is Warp in Photoshop?
Warp gives you a useful way to stretch, bend or fold areas of an image without ruining the pixel data. So, basically when you want to smooth out wrinkles in piece of fabric or how you want a logo positioned onto a curved bottle that`s exactly what the Warp Tool is for. You can locate it under the Edit menu, down in the Transform options (Edit > Transform > Warp).
The Warp Tool displays a grid over the image, allowing you to select certain points and drag them around to reshape them into something new. This is especially popular in the field of product photography, fashion imagery and digital art.
Why Warping an Image Is Important
Now the question is — why is warping an image so important? Let’s look at the reasons:
- Perfect product presentation: On e-commerce sites, the more realistic and clean a product photo looks, the higher the sales. The Warp Tool makes it easy to fix slightly crooked or uneven parts of a product.
- Fixing fabric folds and shape: In clothing photography, garments often don’t sit perfectly. Warp helps make those areas look natural.
- Placing a logo or design: Fitting a logo onto a curved surface (like a mug, bottle, or wall) realistically is nearly impossible without Warp.
- Model photo retouching: Small inconsistencies in body shape, hair, or clothing are often corrected using the Warp Tool.
In short, the Warp Tool is an essential instrument for turning an ordinary photo into a professional, sales-ready image.
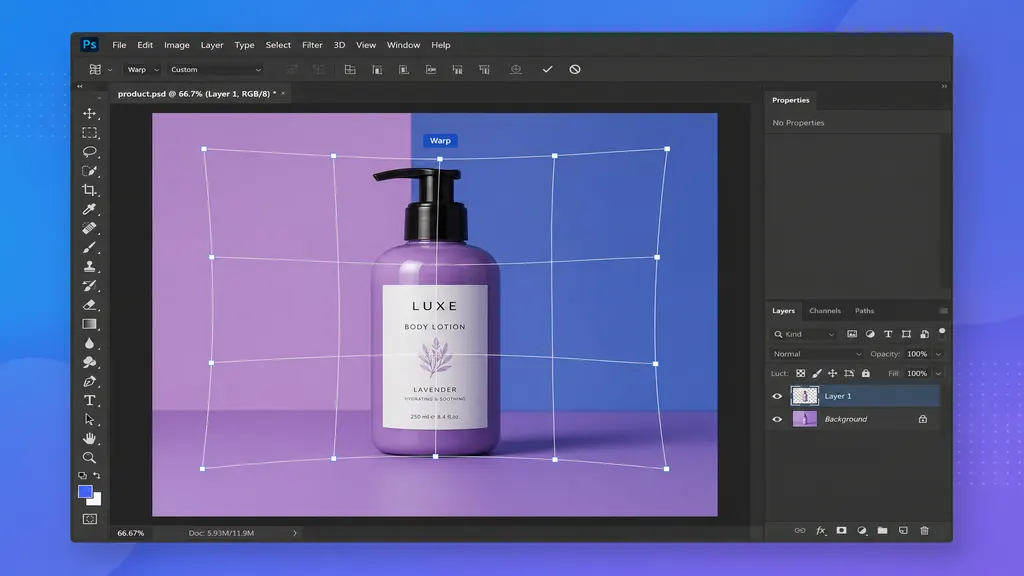
How Does Warp Work in Photoshop (Step-by-Step Guide)
Let’s now look at how you actually warp an image in Photoshop:
Step 1: Open the image and select the layer
First, open your image in Photoshop. Select the layer you want to warp. To make future edits easier, convert the layer into a Smart Object (Right-click > Convert to Smart Object) so you can re-edit it non-destructively later.
Step 2: Go to the Warp option
From the menu, go to Edit > Transform > Warp. A grid will appear over the image.
Step 3: Drag grid points to change the shape
Click and drag any point or line on the grid with your mouse. You can control exactly how much you want to bend it. From the Options Bar at the top, you can choose a preset Warp Style (such as Arc, Flag, Wave, or Fisheye), or select Custom to create your own shape.
Step 4: Increase the grid density if needed
For finer control, you can increase the number of grid sections in the Options Bar (3×3, 4×4, etc.), which makes it easier to edit small areas separately.
Step 5: Press Enter when done
Once the shape looks the way you want, press Enter on your keyboard to apply the change.
That’s it — this is how easily you can reshape any image the way you want.
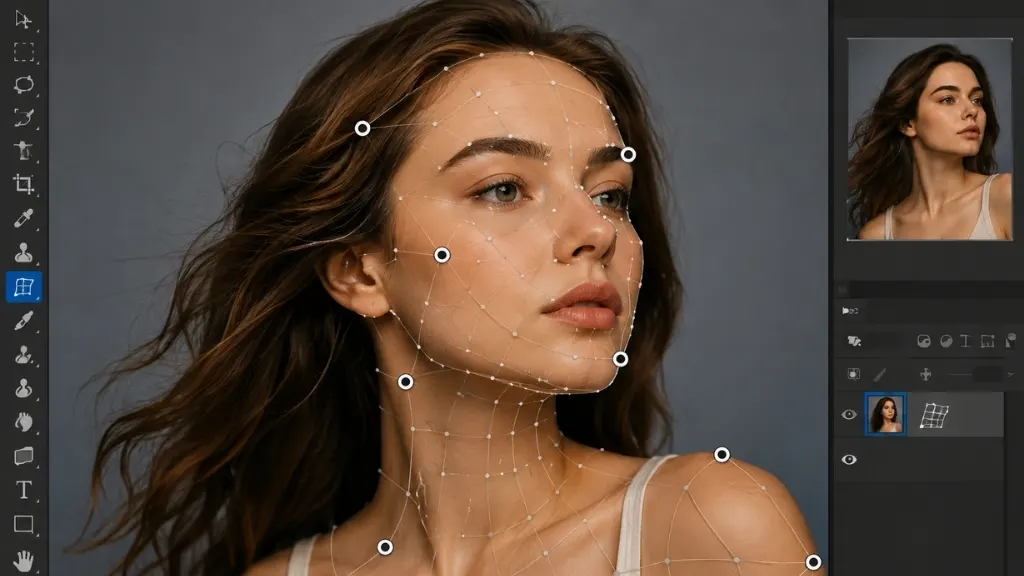
Puppet Warp Tool
The Puppet Warp tool in Photoshop lets you bend, twist, and reposition parts of an image while keeping other areas fixed in place. It works by placing a mesh (a grid of triangles) over your layer, then letting you add “pins” to anchor points you want to hold steady and pins on points you want to move.
How it works:
- Select a layer, then go to Edit > Puppet Warp
- Photoshop overlays a mesh on the layer
- Click to add pins at joints or key points (like an elbow, arm, or leaf)
- Drag a pin to reshape that area — the mesh deforms naturally around it
- Pins you don’t want to move act as anchors, keeping the rest of the image stable
Common uses:
- Repositioning limbs or body parts in photos
- Adjusting hair, fabric, or flowing objects
- Fixing awkward poses without doing a full manual liquify
- Animating parts of an image frame by frame
It’s especially popular in portrait retouching and character/product photography where you need natural, localized bending rather than a global distortion.
Difference between Warp and Puppet Warp:
Feature | Warp | Puppet Warp |
Control method | Grid + handles | Mesh + pins |
Best for | Overall shape distortion, presets | Localized, joint-like bending |
Precision | Broad, smooth curves | Fine control over specific points |
Typical use | Product mockups, text effects | Portraits, limbs, organic shapes |
Common Mistakes to Avoid While Warping an Image
Many people make some common mistakes while warping images, which can make the result look unnatural. Here are a few important ones to watch out for:
- Over-warping: Pulling and stretching more than necessary can make the image look unrealistic or cartoonish.
- Ignoring resolution: Warping a low-resolution image too much can cause pixelation or blurriness.
- Not using a Smart Object: Warping directly on a regular layer removes the option to edit later. Using a Smart Object allows non-destructive editing at any time.
- Ignoring the background: It’s not enough to warp just the object — the shadows and lighting need to match too, or the image will look off.
- Using too few grid points: For complex shapes, a low grid density won’t give you precise enough control.
Avoiding these mistakes will make your edited images look far more professional and realistic.
Conclusion
We hope that this blog helps you understand how to warp image in Photoshop and why it is a significant aspect of professional shuttering. Be it little product pics, model shots, or big shooting—it is very essential to have the understanding of appropriate curvature in your photography so that images look more like real-life. But if you wish to save time or want a professional-level results contact Clipping Creations India and get high quality image editing services with the lowest cost point of view.