
How to Remove Background in GIMP: A Complete Step-by-Step Guide
- August 20, 2026

So you’ve got a photo, and the background is ruining it. Maybe it’s a product shot with a messy table in the frame, or a portrait with a distracting wall behind it. Learning how to remove background in GIMP fixes that, and you don’t need to pay for Photoshop to do it properly. GIMP is free, it’s been around for years, and once you get past the slightly odd menu layout, it does the job just as well as most paid software.
This post walks through the whole process. Opening the file, choosing the right tool for your specific photo, actually deleting the background without wrecking the edges, and saving it so the transparency sticks. Some of this is obvious once you know it, but if you’ve never done it before, a few of these steps trip people up more than you’d expect.
What Is GIMP Background Removal
Basically, it’s cutting your subject loose from whatever’s behind it. Could be a wall, a couch, a plain studio backdrop, doesn’t matter. Once that part of the image is gone, GIMP shows it as transparent, and from there you can put your subject on a white background, a solid color, or drop it into an entirely different scene.
There isn’t just one way to do this in GIMP. A few tools handle it, and which one you reach for depends on the photo:
- Select by Color works fine if the background is a flat, single shade
- Fuzzy Select (people call it the Magic Wand) is better when there’s a bit of shading but nothing complicated
- The Paths tool is what you want for anything with curves or fine detail, jewelry, clothing, that sort of thing
- Layer Masks don’t delete anything, they just hide it, so if you mess something up you can paint it right back
Most people who do this often end up bouncing between two or three of these depending on what the photo throws at them. It’s not really something you memorize, it’s more something you get a feel for after doing it a dozen times.
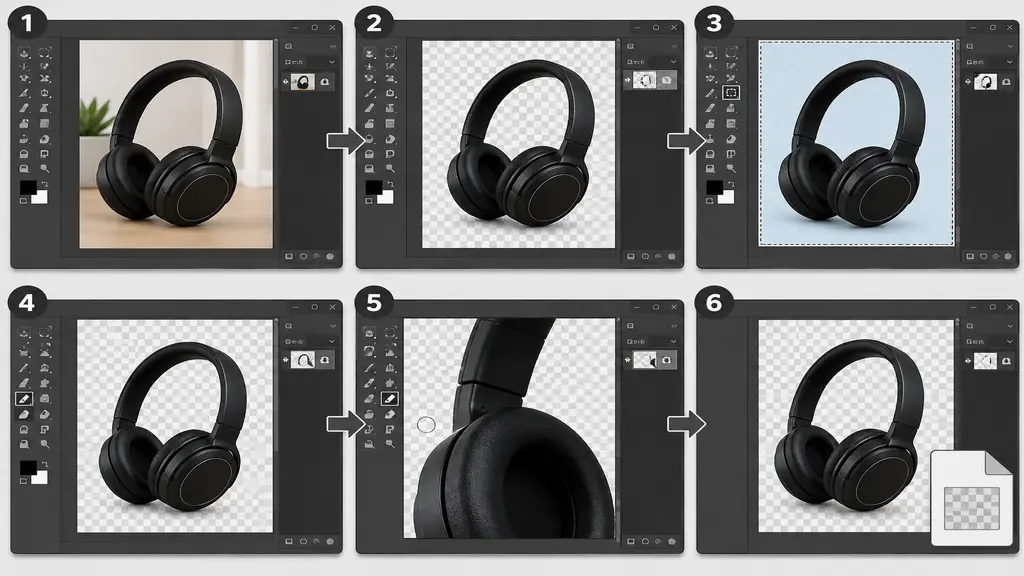
How to Remove Background in GIMP
Here’s the method that most people start with, and a lot of us never really move past it either.
Step 1: Open Your Photo
Open GIMP, go to File > Open, pick your image. One thing worth mentioning, if your photo is already low resolution, no amount of careful editing is going to fix rough edges later. Start with the best file you’ve got.
Step 2: Add an Alpha Channel
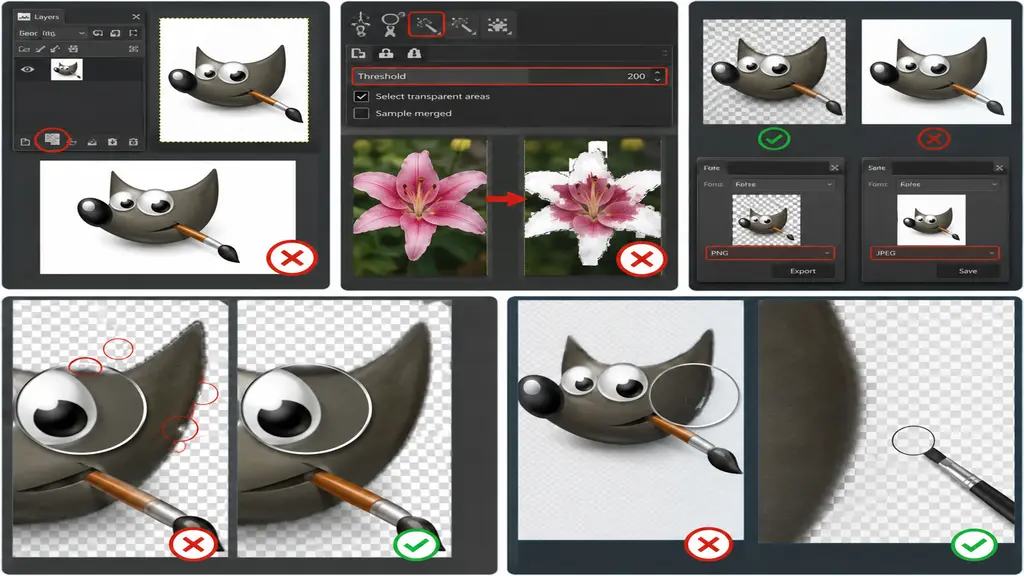
People skip this constantly and then wonder why nothing works. Go to Layer > Transparency > Add Alpha Channel before you touch anything else. If you don’t do this, GIMP has no idea transparency is even allowed on this file, and when you delete the background you’ll just get solid white or black instead.
Step 3: Select Background
This is the part that actually takes some judgment. If your background is one solid color, Select > By Color, then click on the background itself. GIMP picks up every pixel that matches, wherever it shows up in the photo. Saves you from clicking around forever.
If there’s a shadow or some soft shading going on, switch to Fuzzy Select instead (U is the shortcut). Click the background, then play with the Threshold slider until it’s grabbing the right amount, not too little, not eating into your subject.
For anything genuinely tricky, hair, fur, loose fabric, you’ll want the Paths tool. It’s slower, no way around that. Click your way around the outline placing anchor points, then run Select > From Path once you’re done tracing.
Step 4: Delete Background
Selection’s active, hit Delete. That area turns into the gray-and-white checker pattern, which just means it’s transparent now, nothing sinister about it.
Step 5: Clean the Edges
This step is easy to rush through and you shouldn’t. Zoom in, look closely at where your subject meets the empty space. Eraser tool for any background bits still hanging around, Paintbrush with a soft edge if you took off a piece of the subject by mistake. Honestly, this is the step that separates a decent cutout from one that looks obviously edited.
Step 6: Save as PNG
File > Export As, pick PNG. This matters more than it sounds like it should, PNG is really the only format most people use that keeps transparency. Save it as JPG by accident and all that edge work you just did is gone.
Best GIMP Tools for Background Removal
Different photos, different tools. Here’s roughly how to think about it.
- Select by Color: quickest option when you’re working with a plain white or single-color backdrop
- Fuzzy Select: a bit more forgiving with light gradients or soft shadows
- Paths Tool: the one for precise work, curved or irregular shapes especially
- Scissors Select: snaps to edges by itself, works well when the subject outline is already pretty clear
- Layer Mask: nothing gets deleted permanently, good if you think you’ll want to tweak things again later
Don’t try to learn all five at once. Pick one, use it for a while, add the next when you actually need it.
Common GIMP Background Removal Mistakes
Even people who’ve been doing this for years still hit a few of these from time to time.
- Forgetting the alpha channel step, so the background refuses to go transparent no matter what
- Pushing the Fuzzy Select threshold too high, which starts eating parts of the subject you actually wanted to keep
- Saving as JPG out of habit, then wondering why the transparent background came back as solid white
- Missing tiny leftover pixels along the edges, they’re barely visible until you place the image somewhere else and suddenly they stand out
- Skipping the zoom-in step during cleanup, small mistakes hide in plain sight at normal zoom level
Catching these the first time around saves you from redoing the whole thing later.
When to Use a Background Removal Service
For a handful of photos with a simple background, GIMP is genuinely enough, you don’t need anything fancier. But say you’re editing two hundred product photos a week, or the subjects are jewelry, glass, anything with fussy edges, doing all of that by hand starts costing you real time. This is where something like a background removal service actually earns its keep. Instead of you sitting there clicking through selections one photo at a time, a team handles the batch, keeps the quality consistent across all of them, and turns it around fast, at a price that works whether you’re running a small shop or a much bigger catalog. If you’d rather spend your time running the business than editing photos every night, it’s worth looking into.
Tips for a Cleaner Background Removal
A few small habits go a long way here.
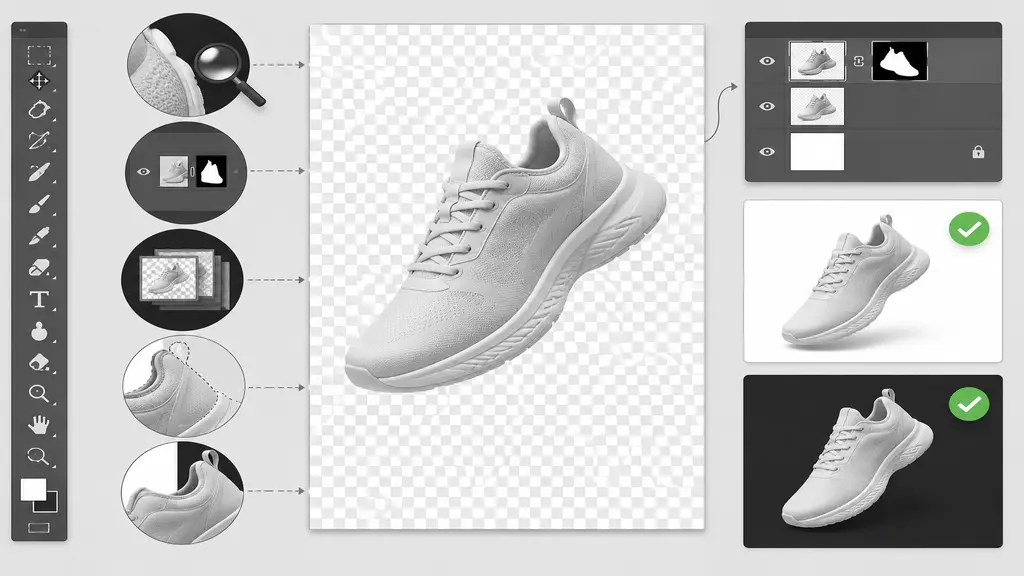
- Zoom in past 200 percent when cleaning edges, you’ll catch stuff that’s just invisible otherwise
- Use a layer mask instead of straight deletion, mistakes are reversible that way without losing quality
- Keep the original file untouched, work on a duplicate layer just in case
- A slight feather on your selection, a pixel or two, softens edges so they don’t look cut out with scissors
- Drop your finished cutout on both a white and a dark background to check for stray edge pixels you might’ve missed
Conclusion
That covers how to remove background in GIMP from start to finish. It’s free, it works, and once you’ve done it a few times the whole process takes a fraction of the time it did the first attempt. Switching naturally between Select by Color, Fuzzy Select, and the Paths tool depending on what’s in front of you is really the whole trick. And if you ever hit a point where the volume of photos is more than you can reasonably keep up with by hand, a professional service is there to take that off your plate without dropping the quality.
