
How to Edit Photos on iPhone: A Complete Beginner to Pro Guide
- August 1, 2026
Apple smartphones are equipped with very powerful mobile cameras in the modern world. Even so, a great photo only gets you halfway there. The magic often happens in the editing. But Apple has great editing tools available right inside the Photos app, so anyone can enhance images without the need to download additional software.
If you are looking for ways to edit photos on iPhone, I am at your disposal. If you want brighter holiday pics, professional-looking portraits or beautiful social media images, then these iPhone photo editing tools will help your efforts look great.
As a professional photo-enhancer who uses photo editing tools all the time, I found that many people do not know some of the robust features already present on their iPhones. Sure, there comes a time when you need something commercial-grade, but for most everyday editing things Apple does very well with the built-in editor.
In this guide, you’ll learn step-by-step techniques, understand important editing settings, and discover practical tips that instantly improve your photos.
How to Edit Photo in iPhone Using the Photos App
The built-in Photos app provides everything most users need.
To begin:
- Open the Photos app.
- Select the image you want to edit.
- Tap Edit in the upper-right corner.
- Choose adjustments, filters, or cropping tools.
- Tap Done when finished.
Although the process seems simple, understanding each tool helps you achieve much better results.
Cropping and Straightening Photos
Composition often improves dramatically after cropping.
To crop:
- Open Edit mode.
- Tap the Crop icon.
- Drag corners to adjust framing.
- Straighten the horizon if necessary.
Cropping helps:
- Remove distractions
- Improve balance
- Create stronger visual focus
Additionally, straight horizons instantly make photos look more professional.
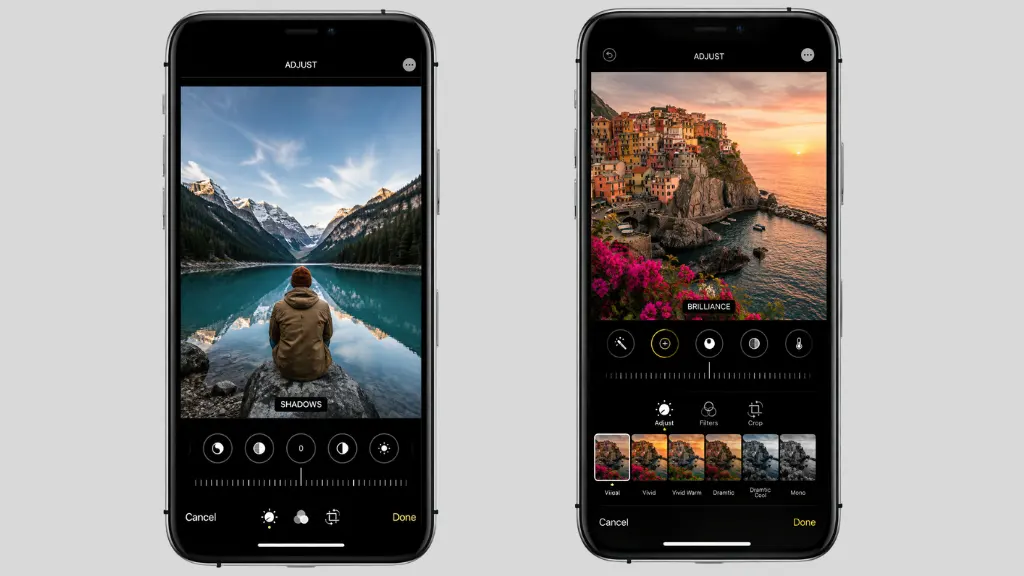
Understanding iPhone Photo Editing Settings
One of the most important parts of learning iPhone editing involves understanding the adjustment tools. Let’s examine the most useful settings.
Exposure
Exposure controls overall brightness. Increase exposure when a photo looks too dark. Reduce exposure when highlights appear overly bright. However, avoid extreme adjustments because they can reduce image quality.
Brilliance
Brilliance improves overall balance. It brightens dark areas while protecting highlights. In many cases, brilliance provides a more natural enhancement than exposure alone. Consequently, it’s often one of the first settings I adjust.
Highlights
Highlights affect the brightest areas.
Lower highlights when:
- Clouds lose detail
- Bright skies appear washed out
- Light reflections become distracting
Reducing highlights often restores detail that initially appears lost.
Shadows
Shadows control darker regions. Increase shadows to reveal hidden details.
This adjustment works especially well for:
- Landscape photography
- Indoor photos
- Backlit subjects
Nevertheless, avoid excessive shadow recovery because it may introduce noise.
Contrast
Contrast increases the difference between bright and dark areas. Higher contrast creates a dramatic appearance. Lower contrast creates a softer look. Most professional edits use moderate contrast adjustments rather than extreme values.
Brightness
Brightness adjusts overall light levels. It is similar to exposure, but it affects the image differently. Most of the time small changes in brightness just help to finish an edit after using other adjustments.
Black Point
Black Point deepens darker tones. Raising this increases the body richness and thickness. Black Point is used by many photographers to give their images a more professional feel.
Saturation
Saturation controls color intensity. Increasing saturation makes colors stronger. But when saturation is over done, some photos may result unrealistic. Incorporate subtle enhancements whenever possible.
Vibrance
Vibrance lifts less saturated colors. Vibrance, in contrast to saturation, has a much better safeguard for skin tones. This is why a lot of editors prefer to use vibrance for portraits and everyday photography.
Warmth
Warmth affects color temperature.
Increase warmth for:
- Sunsets
- Golden-hour photos
- Cozy indoor scenes
Decrease warmth to create cooler, cleaner tones.
Tint
Tint adjusts green and magenta color balance. Use it carefully to correct color casts. Small adjustments usually produce the best results.
Using iPhone Photo Effects
Many users enjoy applying filters.
Apple includes several built-in photo effects that can quickly transform images.
- Vivid: Enhances colors and contrast. Works well for travel and landscape photography.
- Vivid Warm: Adds warmth while increasing color intensity. Ideal for sunsets and outdoor scenes.
- Dramatic: Creates stronger shadows and contrast. Useful for urban photography and architectural shots.
- Dramatic Cool: Produces a moody appearance with cooler tones. Popular for creative photography.
- Mono: Converts photos to black and white. Excellent for portraits and artistic images.
Conclusion
Photo editing on iPhone — up your photography game without splashing on software! Apple has some pretty amazing built-in editing tools that allow you to make adjustments on exposure, color, sharpness, and even the composition of a photo. They are simple enough for beginners but offer plenty of control for advanced users.
The subtlety of absence is the essence of good editing. Avoid large changes, and aims to build-on what is already there in the image. As you practice, you will have an editing style that makes your photos appear cleaner, more professional & engaging.
No matter if you are editing family memories, travel snaps, portraits or social media content, everything is on your iPhone and the components needed to achieve great results are there.