
How to Clipping Path in Photoshop: A Step-by-Step Guide
- July 29, 2026
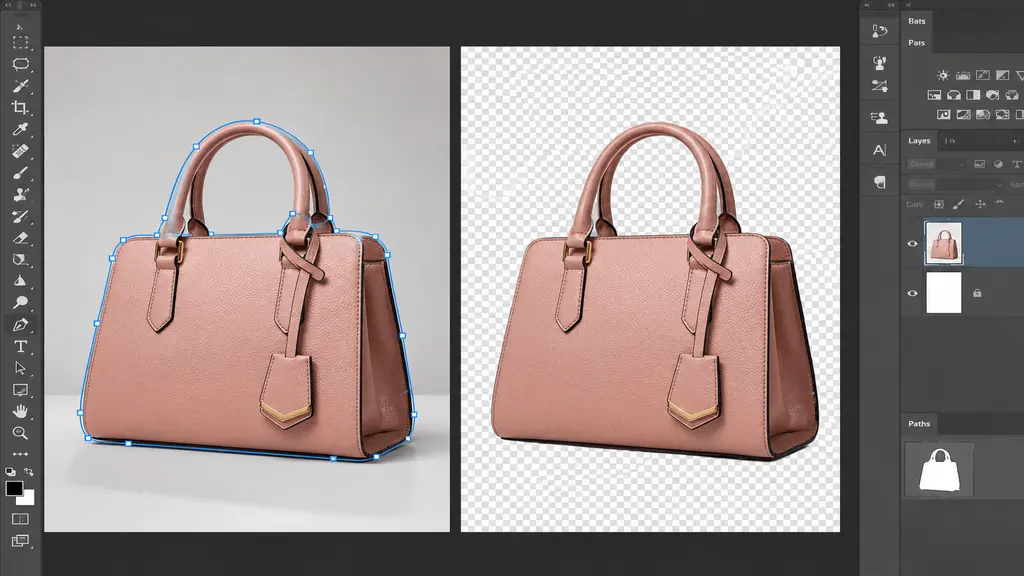
Okay, so how to clipping path in Photoshop. You’ve probably already watched two or three YouTube videos on this and still feel a bit lost, and that’s fine, most tutorials either blast through it in thirty seconds or drown you in terminology before you’ve even opened the file. Here’s the short version first: a clipping path is a precise outline drawn around your subject, and it lets you pull that subject away from its background cleanly, keep the edges sharp, and drop the cutout anywhere else without the old background tagging along. Product photographers do this all day. Jewelry, apparel, catalog shots, plain white backdrops, all the same idea underneath. What follows is the process people actually use, not the polished version.
Why the Pen Tool, and Not Just Quick Selection or the Eraser?
Reasonable thing to wonder, since Photoshop’s got half a dozen ways to pull off a background now. Quick Selection is fast. So is the background eraser. But both leave slightly soft or uneven edges, and it shows up worst around curves and small detail. A path made with the Pen tool skips that problem entirely because it’s vector, not pixels. Scale it up, scale it down, doesn’t matter, the edge stays sharp either way. And because it’s a path and not a selection, you can reopen it later and nudge one anchor point without redoing the entire outline. On catalog work where every product needs to look consistent, that matters more than you’d guess. People notice when edges don’t match, even if they couldn’t tell you why.
Nobody mentions the reuse part until it actually saves them a headache, so here it is. A saved path just sits in the file. Client comes back in six months wanting the same product on a different background? You’re not starting over. Quick selections don’t survive the same way once a file’s closed, so a lot of people end up re-doing work they’d technically already finished.
What You’ll Actually Need
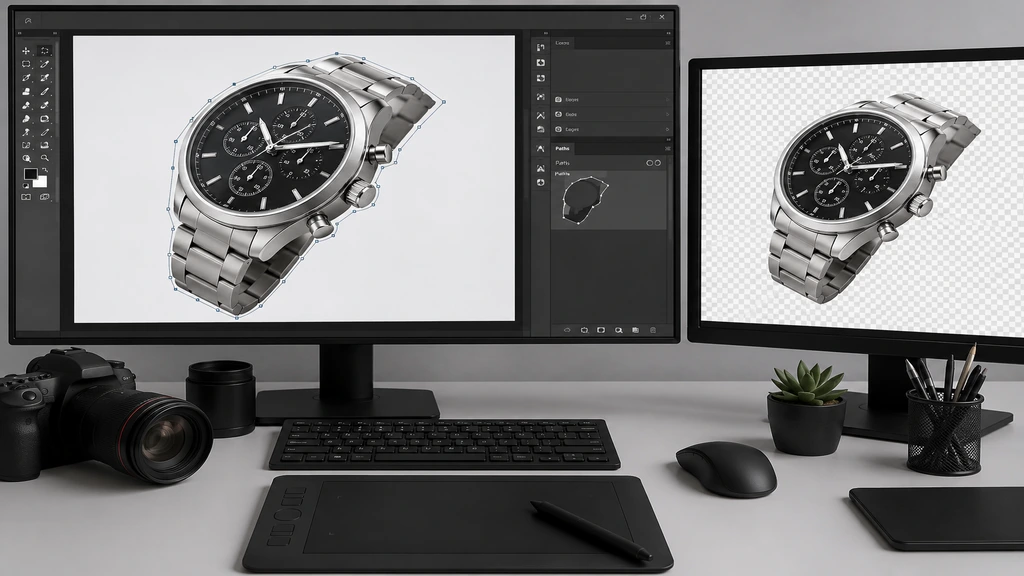
Photoshop, obviously, and any halfway recent version is fine since the Pen tools barely changed in years. Start on a photo with clean, well-lit edges, jewelry or electronics or packaged goods work best. Hair, fur, loose fabric, save those for later, they’re a different level of difficult. Open the Paths panel too, Window then Paths, before you even pick up the Pen tool. It’s easy to forget this panel exists until you’ve already lost a path you needed.
Doesn’t hurt to have a second monitor, though it’s not required. Mostly it just means less panel-juggling while you’re zoomed in tight tracing something. And pick a photo shot against a plain background to practice on first. Fighting bad lighting and the Pen tool at the same time, in the same week, is a rough combination for basically everyone.
How to Clipping Path in Photoshop: Step-by-Step
Not one single “right” way here, it depends what you’ve got and what actually needs fixing. Some of these take thirty seconds. The others might require a bit more preparation. Select the one that suits your situation and discard the rest.There is no need to rewrite the entire agreement just to correct typos or spelling errors before the afternoon. Find the one that matches, use it, done. Half the frustration people run into is reaching for Acrobat when a browser tab would’ve handled it in ten seconds flat.
Step 1: Open the Paths Panel
Window, then Paths. Do this before tracing anything. This is where the finished path saves as a named layer, and it’s genuinely easy to lose track of unsaved work if this panel’s closed the whole time.
Step 2: Set the Pen Tool to “Path” Mode
Grab the Pen tool. Check the top bar. Make sure it says “Path,” not “Shape.” People mess this up constantly because Shape mode fills the outline with solid color instead of a clean, editable path, and it’s not obvious at a glance which one you’re in.
Step 3: Trace the Outline
Click anchor points along the edge, following the contour as tightly as your hand allows. Straight parts, single click. Curves, click and drag, which pulls out direction handles you adjust until the curve actually matches the subject underneath. Slow down around corners. Every mistake worth mentioning happens there.
Step 4: Close the Path
Trace the whole way, then click back on that very first anchor point. A small circle appears near the cursor once you’re lined up. That’s the loop closing. Miss it, even slightly, and the path won’t convert into a usable selection later. No warning, either. It just quietly doesn’t work.
Step 5: Save the Path
Double-click “Work Path” in the panel, rename it something real. Skip this and Photoshop might toss the whole thing the next time you start a new path, and losing ten careful minutes of tracing is genuinely annoying.
Step 6: Turn the Path Into a Selection
Path selected in the panel, open the panel menu, click “Make Selection.” Or Ctrl/Cmd-click the path thumbnail directly, same result. Now it’s an active selection you can actually use.
Step 7: Isolate or Export
Add a layer mask to hide everything outside the selection, or copy the subject onto its own transparent layer. PNG export if you need the transparency to stick around, or place it right onto whatever new background the job calls for.
Where People Go Wrong
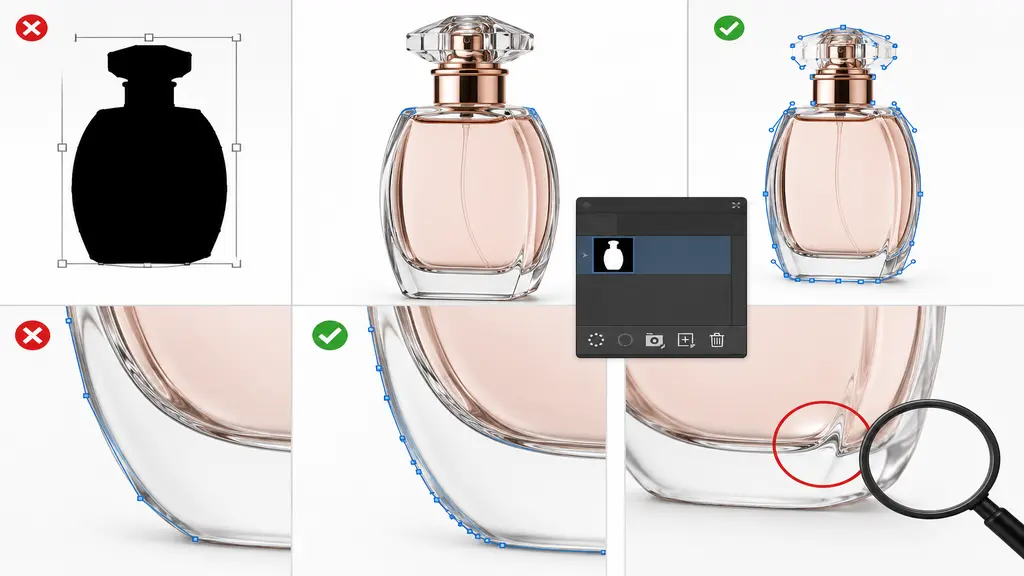
Shape mode instead of Path mode, still probably the single most common early mistake, and it wrecks the whole thing quietly before you’ve even noticed. Too few anchor points on curves comes next, leaves the shape looking blocky, painfully obvious on anything rounded like a bottle or a ring. Forgetting to actually name and save the path causes trouble nobody sees coming until the file’s closed and the work’s gone. And not zooming in enough means missing small spots that only surface once you’re reviewing the finished export, at which point you’re redoing part of it anyway.
When Handing It Off Actually Makes Sense
Doing a photo or two by hand, no problem, good way to build the skill honestly. A few signs it’s time to pass it off instead:
- The batch size stopped making sense: Fifty a week, fine. Five hundred a week, that’s basically a full-time job squeezed into whatever hours were left for everything else.
- Quality slips once the deadline’s close: Edges done at midnight rarely match the care put into the first few of the batch, and clients somehow always notice, even when they can’t say exactly what’s off.
- The subjects need real precision: Tiny stones, thin chains, fussy settings, that kind of thing takes patience most people don’t have time for at volume.
- Your hours are worth more elsewhere: Time spent tracing paths is time not spent shooting product, running the store, or actually talking to the client who’s paying for all this.
This is precisely the repetitive, detail-heavy work agencies like Clipping Creation India take on regularly, large batches of clipping paths across jewelry, apparel, and general product photography, kept consistent from the first image to the last. Past a certain point it’s usually cheaper to hand it off than to grind through it solo.
Conclusion
Do these enough times, and how to clipping path in Photoshop stops feeling technical and starts feeling automatic, just another step in the workflow. Paths panel open, Pen tool set correctly, trace it carefully, close the loop, save the path, convert to a selection. Start simple. And once the workload outpaces the hours available, a service like Clipping Creation India can absorb the repetitive parts while keeping quality steady across the whole batch.
