
How to Tell If a Photo Is Photoshopped: 10 Signs to Look For
- September 10, 2026
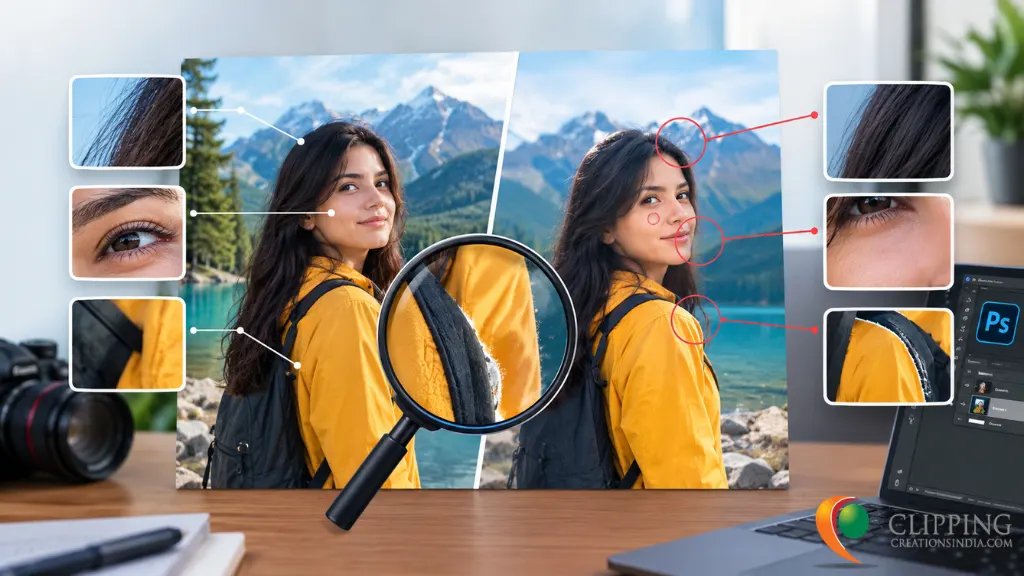
These days, however, knowing how to detect photoshopped images has come in handy more than ever. From social media posts to online ads, news articles and dating profiles, the photos are everywhere. Because at first glance, after the even modest editing, many edited images appear completely natural and it is difficult to understand whether what you see is real or a fake.
Some photo edits are harmless. A photographer is used to converging with slight modifications in brightness, eliminating tiny distractions and enhancing colours. Some edits will make an image have a completely different meaning. You can add or remove a person, you can make a product appear differently, and you can merge two different photos into one.
The good news is that you do not have to be a Photoshop genius to identify most common editing errors. Cues that indicate an image is manipulated are often visible in the lighting, shadows, edges, reflections and proportions you see in it.
In this article, we will show you if whether a photo is photoshopped or not using basic techniques and real examples that anybody can understand.
What is a Photoshopped Photo?
Before knowing how you will find out a photoshopped photo, you need to know what a photoshopped photo is. A photoshopped image called “Which Photo” that has been changed or customized by using editing software. Photoshop is one of the most popular and well-known programs for this type of image editing. Actually, everyone defines an edited image as a photoshopped image. These edits can be small or major.
For example, someone may:
- Remove an unwanted object
- Change a person’s appearance
- Replace the background
- Add another person to a photo
- Change the color of an object
- Make a product look larger or smaller
- Combine multiple images
Not every edited photo is fake or misleading. Professional photographers edit photos regularly. The important question is whether the editing changes reality in a way that matters.
Why do we need a photoshopped photo?
They add enhanced appeal to the images with numerous ads which are highly based on photoshopped photos. They all have image editing for various purposes, such as removing unwanted objects, fixing the lighting, and correcting colors. Companies also edit for clean professional looking products. Moreover, photographers edit images and create various creative visual effects using Photoshop. Photo editing meaning mainly to be clear to communicate the idea and good looking high quality images.
How to Tell If a Photo Is Photoshopped: 10 Signs to Look For
Here we show which particular elements you look for to understand a photoshopped photo.
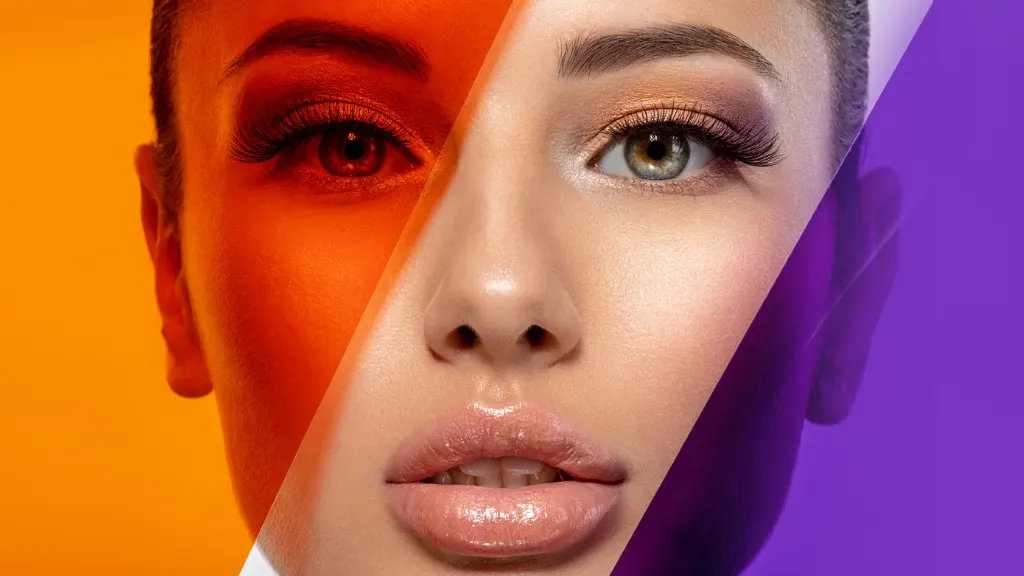
Check Skin Textures and Pores
Another useful technique is to find out if a photo is photoshopped by looking closely at the person’s skin. Real skin naturally has pores, small lines, texture, and minor imperfections. When a photo is edited so much, the skin look like unusually smooth, blurry, or plastic-like.
Suppose a person’s face looks completely smooth with no visible pores or natural texture. Maybe a strong retouching will happen. In some cases, the skin around the face looks sharp, while other areas appear overly blurred.
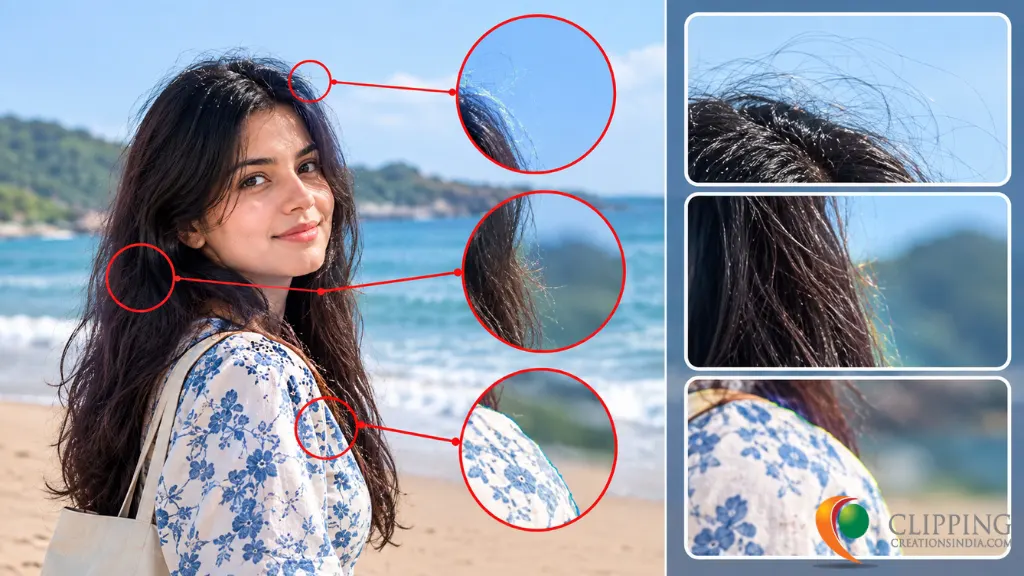
Look at the photo Edges
One of the easiest ways to check an edited image is to look closely at the edges around objects. When someone removes a person or object from one image and places it into another, the edges may not blend perfectly.
Look for:
- Rough outlines
- Blurry edges
- Strange glowing borders
- Missing hair details
- Sharp edges against a blurry background
- Background colors bleeding into the subject
For example, imagine a person standing in front of a beach. If the person was copied from another photo, you may notice a faint outline around their hair or shoulders. Zooming into the image can make these problems easier to see.
Modern editing tools can create very clean selections, so this method does not always reveal manipulation. Still, poor edge blending remains a common sign.
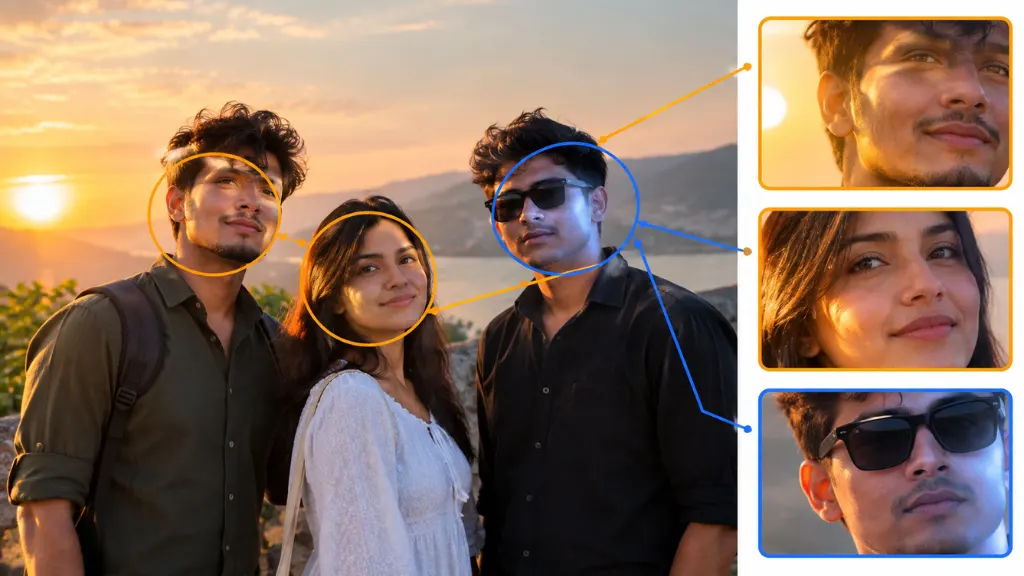
Check the Lighting in the Photo
Lighting can reveal a lot when you are trying to understand how to tell if a photo is photoshopped. Every object in a real photograph should generally follow the same light source. Look at where the light is coming from.
Ask yourself:
- Is the light coming from the same direction?
- Are some faces brightly lit while nearby objects are dark?
- Does one object have warm lighting while the rest of the photo has cool lighting?
- Does the brightness match across the image?
Imagine a photo of three people standing outside during sunset. If sunlight is hitting two people from the left but the third person’s face is lit from the right, something may be wrong. This does not automatically prove that the photo is edited. Multiple light sources can create different results. However, inconsistent lighting is worth checking carefully.
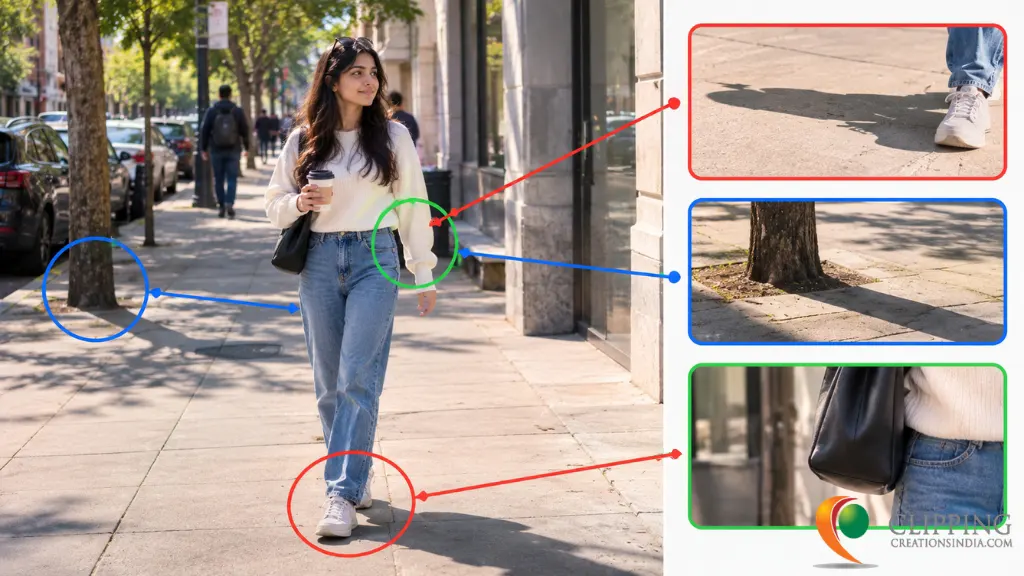
Look for Incorrect or Missing Shadows
Shadows are another useful clue. In a real photo, shadows are affected by the direction and strength of the light. If an object is added to an image, the editor may forget to create a realistic shadow.
Check for:
- Missing shadows
- Shadows facing the wrong direction
- Shadows that are too dark or too light
- Different shadow shapes
- Objects that appear to float above the ground
For example, imagine a person standing on a sunny street. The buildings, cars, and other people all cast shadows toward the right. However, the main person’s shadow goes toward the left. That inconsistency may suggest that the person was added from another photograph.
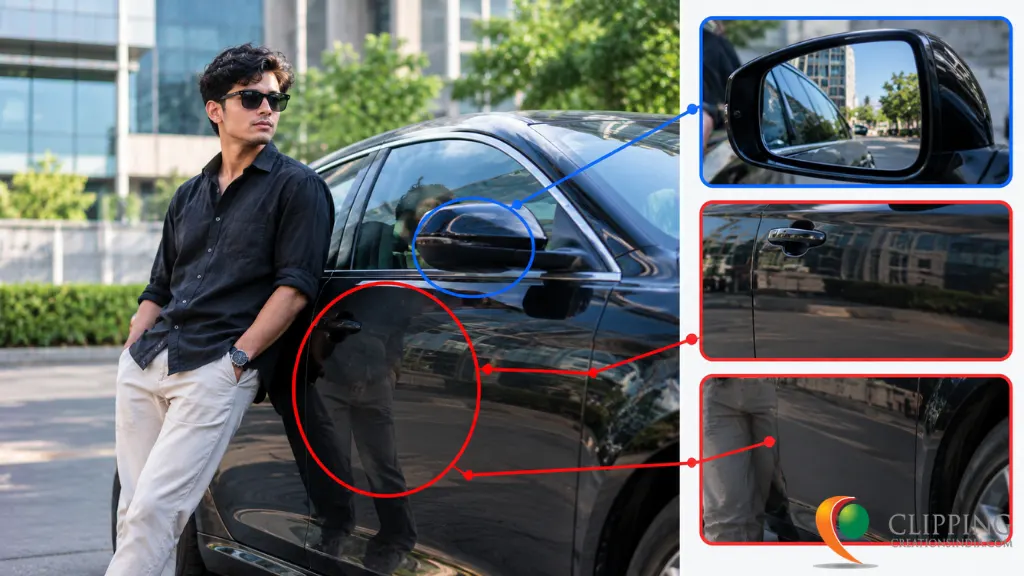
Check Reflections in Mirrors and Glass
Reflections can be surprisingly useful when checking whether an image has been edited.
Look carefully at:
- Mirrors
- Windows
- Sunglasses
- Water
- Shiny cars
- Glass tables
If an object appears in front of a reflective surface, its reflection should generally match the scene. For example, imagine a person standing next to a shiny car. The person may be visible in the main image but missing from the car’s reflection. This could indicate that the person was added later. Reflections can also expose incorrect body positions. A person’s pose should make sense when compared with the reflected image. This is one of the details that people often miss when looking at a photo quickly.
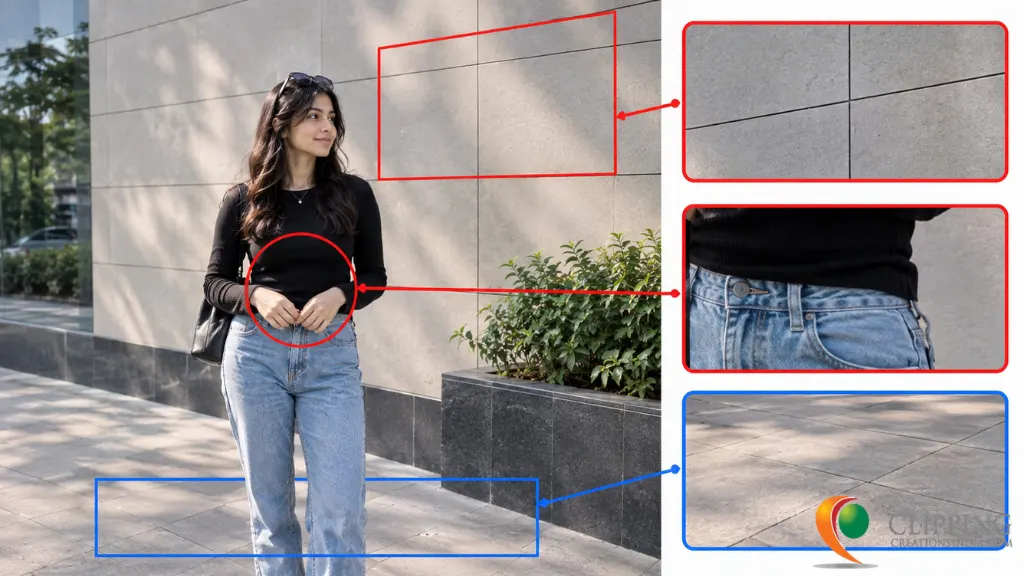
Checking the photo Background
The background often contains clues that are difficult for editors to fix perfectly. Look closely at straight lines and repeating patterns.
Check:
- Buildings
- Doors
- Fences
- Tiles
- Roads
- Furniture
- Trees
Poor editing can create warped or bent background lines. For example, a person may use an editing tool to make their waist appear smaller. If there is a straight wall, door, or fence behind them, that line may bend unnaturally around the edited area. This is often seen in heavily edited social media photos.
A curved wall or distorted pattern does not always mean Photoshop was used. Camera lenses can also create distortion. Compare the suspicious area with the rest of the image before making a decision.
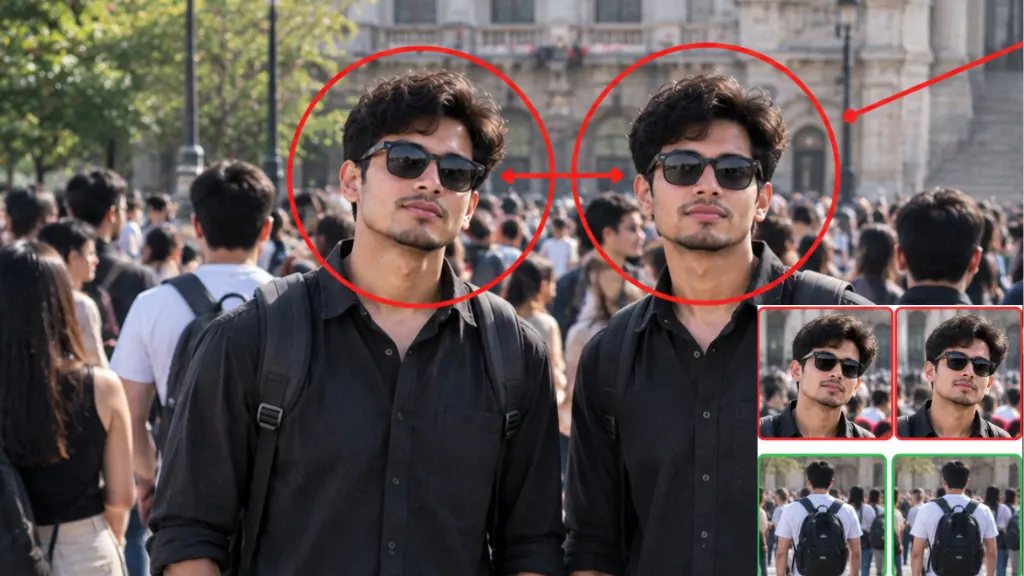
Look for Repeated Patterns and Duplicate Objects
Another simple method is to look for repeated details. When an object is removed from an image, some editing tools copy nearby pixels to fill the empty space. This can sometimes create duplicate patterns.
Look for:
- Repeated leaves
- Identical clouds
- Duplicate people
- Repeated bricks
- Copy-and-paste textures
- Similar objects appearing more than once
For example, imagine a large crowd photo. If two people have exactly the same face, clothing position, and body pose, part of the image may have been copied and repeated. Repeated patterns can be easier to spot when you zoom in.
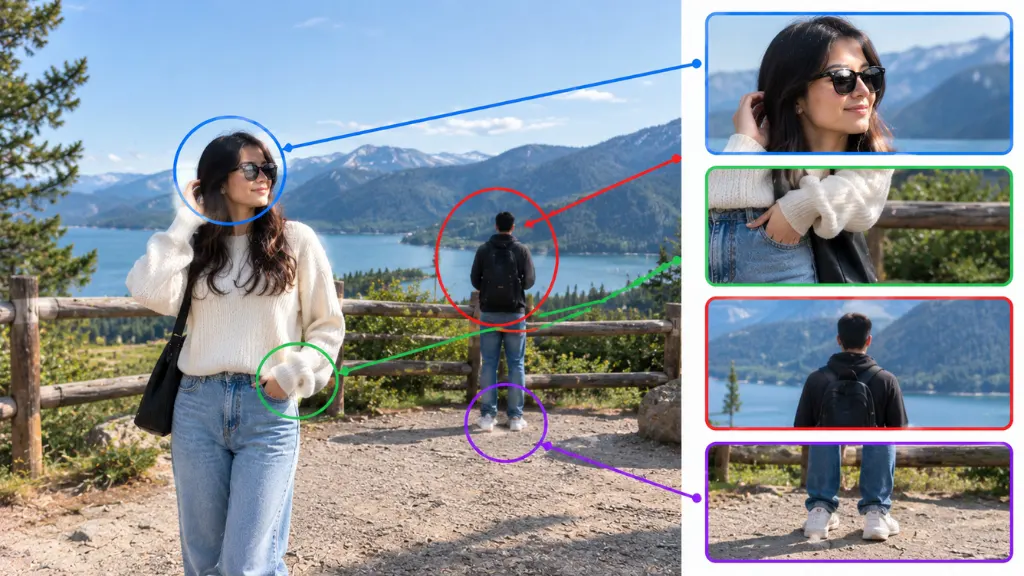
Check the Size and Proportions of Objects
Incorrect proportions can also reveal photo manipulation. Compare objects with other items in the image.
Ask yourself:
- Does the person’s head look too large?
- Are the hands unusually small?
- Does the object match the distance from the camera?
- Does a product look larger than expected?
- Do people in the same area have realistic sizes?
Perspective matters. Objects that are farther away should normally appear smaller. If someone is added to a scene but their size does not match the distance, the final image can look unnatural.
For example, a person standing far behind another person should not appear almost the same size unless the perspective supports it.
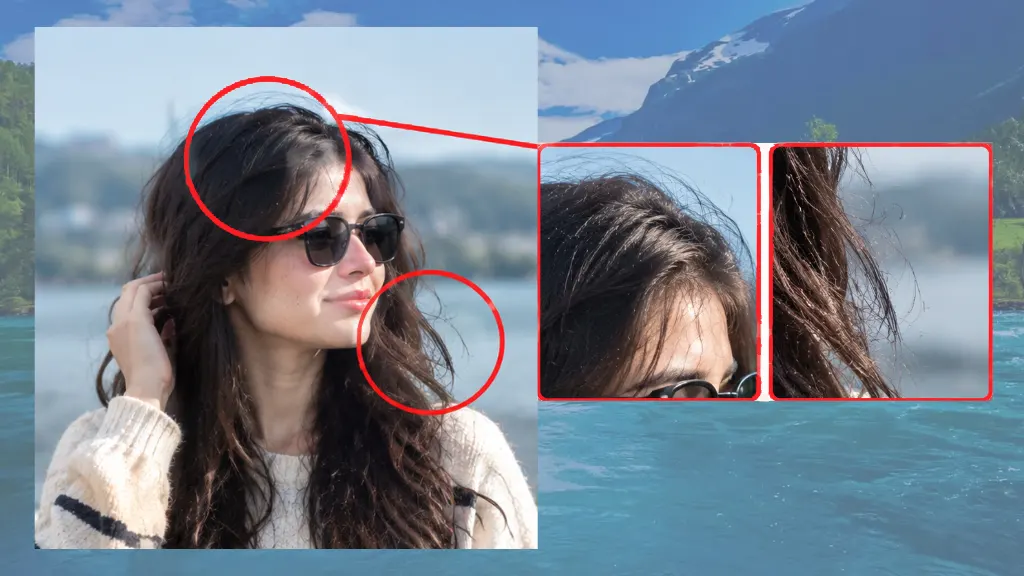
Look Closely at Hair, Hands, and Small Details
Some parts of an image are more difficult to edit naturally. Hair can be challenging because it contains many thin strands. Hands can also reveal problems because fingers have complex shapes and positions.
Look for:
- Missing fingers
- Unnatural finger shapes
- Blurred hands
- Strange hair edges
- Hair blending into the background
- Repeated hair patterns
For example, if a person’s hair suddenly disappears into the background with a soft blurry edge, the background may have been removed or replaced.
However, do not judge a photo based on one small detail alone. Compression and low image quality can also make hands and hair look strange.
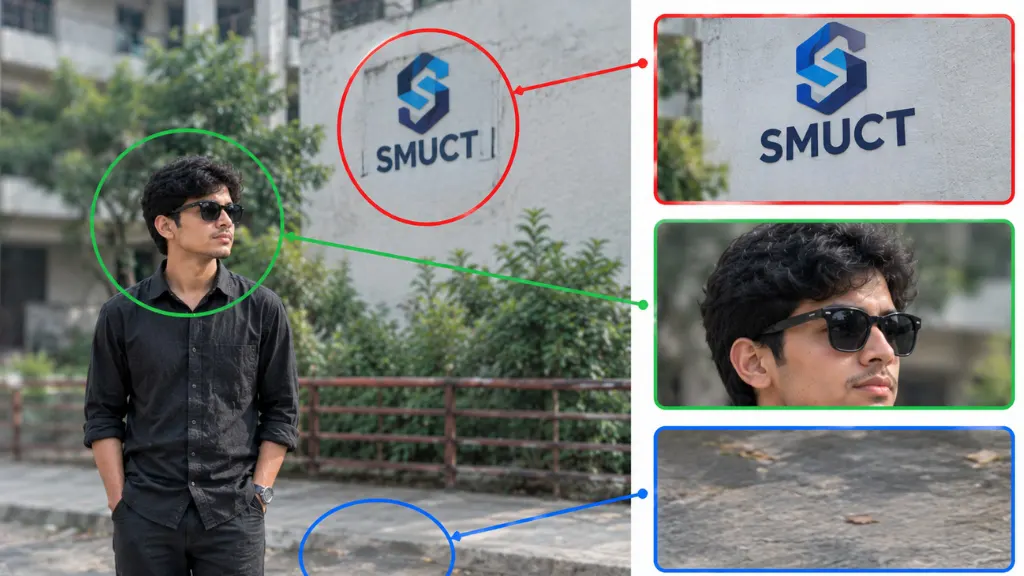
Check the Image Quality Around Different Objects
A photoshopped image may contain areas with different levels of quality. One object may look sharp while the rest of the photo looks blurry.
Look for:
- Different sharpness levels
- Uneven image noise
- Different amounts of blur
- Pixelation around one object
- Changes in image texture
For example, imagine an old, low-quality photograph with a very sharp logo added to the wall. The logo may look too clean compared with everything around it. Similarly, an object copied from a high-resolution image may look unusually sharp when placed into a low-resolution photo.
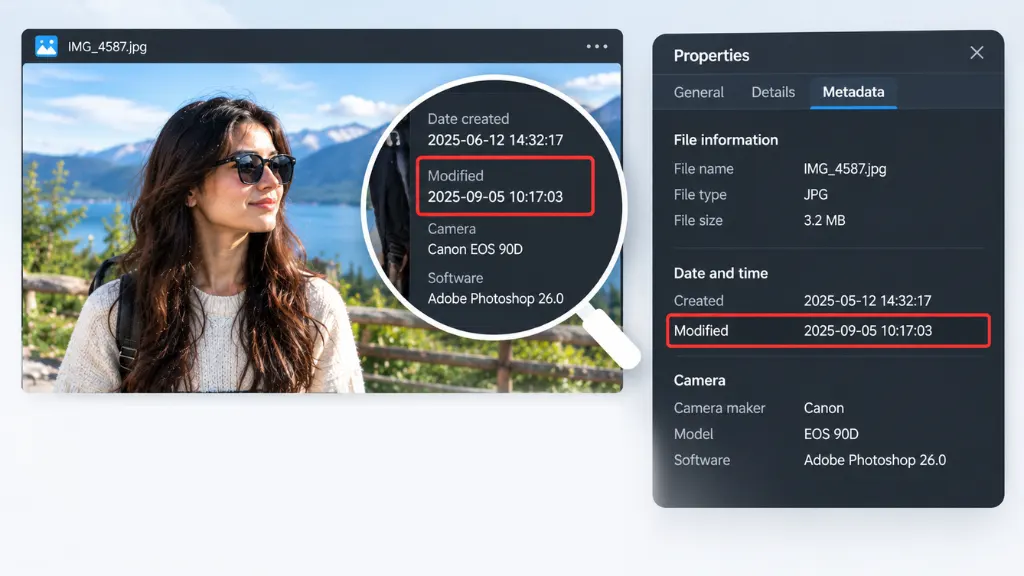
How to Tell If a Photo Is Photoshopped Using Metadata
Photo metadata can sometimes provide useful information.
Metadata may include details such as:
- Camera model
- Date the photo was taken
- Image dimensions
- Editing software
Sometimes the image file has the information that the image was edited by this software. However, metadata is not always trustable. Maximum websites and social media platforms remove metadata when images are uploaded. They are able to edit or delete the metadata.
So, finding Photoshop information in metadata does not prove that an image is fake. A photographer might be used for normal color correction. On the other hand, missing metadata does not prove that a photo is original. Use metadata as one clue, not as final proof.
Can You Always Tell If a Photo Is Photoshopped?
No. You cannot always tell with complete certainty by simply looking at an image. Professional editors can create highly realistic results.
Modern editing software also includes tools that can match:
- Lighting
- Shadows
- Colors
- Texture
- Perspective
Because of this, a well-edited image may leave no obvious visual mistakes. This is why it is better to avoid saying that a photo is definitely fake based on one suspicious detail. Look for several clues. Then check the image source, context, and original version if possible.
Common Mistakes People Make When Checking Edited Photos
People sometimes assume that every unusual image is photoshopped.
That is not always true.
Avoid making quick decisions based on:
- One blurry edge
- Strange lighting caused by multiple lamps
- Camera lens distortion
- Low image quality
- Heavy image compression
A compressed image can create strange pixels and blurry edges. Wide-angle lenses can bend straight lines. Strong sunlight can also create unexpected shadows. Instead of relying on one sign, examine the entire image. The more clues you find, the stronger your conclusion becomes.
Quick Checklist to Spot a Photoshopped Photo
When checking an image, look for these signs:
- Check the edges around people and objects.
- Compare the direction of light.
- Look at shadows.
- Check mirrors and reflections.
- Examine background lines.
- Search for repeated patterns.
- Compare object sizes.
- Look at hands and hair.
- Compare image quality across the photo.
- Check the image source with reverse image search.
This checklist can help you examine an image more carefully.
Conclusion
You really do not have to be an expert in figuring out how to identify if they photo is photoshopped. Simply being observant of light and shadow direction, body dimensions, shapes of hands and fingers, background patterns, and color uniformity will lead you to most retouched photographs. If you want added peace of mind, free tools such as FotoForensics or Forensically can confirm what your eyes are already picking up. However, these little tricks make an enormous difference in cutting through the haze of gears to distinguish what is real and what is not; in a world where practically every other photo on the web has received engineered advice.